DIY Valentine’s Day Pom Pom Garland

Hey everyone! Now we are just a few weeks away from Valentine’s Day so I don’t feel totally crazy doing another decor post! I was planning out my week and turned the page and BAM! February is next month…how did that happen?

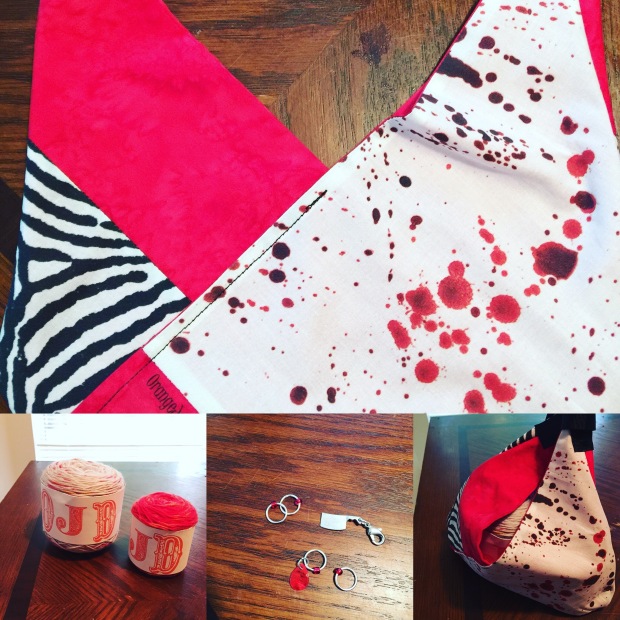
Anyways, I got the idea for the Pom Pom garland from Pinterest (where many a light bulb moment is had), but since I didn’t need it for a birthday or photo backdrop I thought Valentine’s Day would be the perfect theme to start with! I mostly knit with only animal fiber now (amen!) but I do still have a lot of acrylic on hand and Michael’s had a huge yarn sale at the beginning of the month and thought this would be a perfect for use for it.
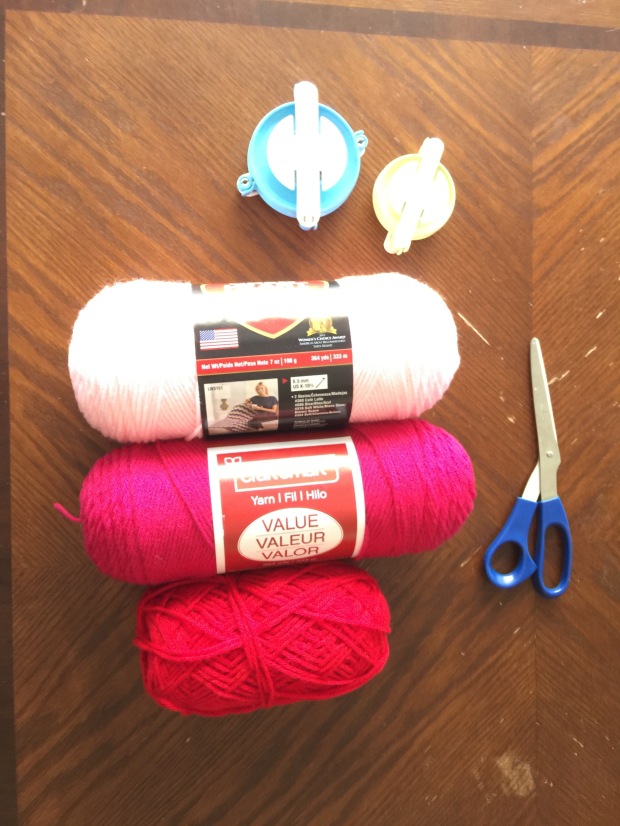
DIYPomPomGarland_Pinterest

Supplies:

  • Pom Pom maker (or you can google how to make yourself one, but the $7 investment is WELL worth it!)
  • Yarn in festive colors (I had magenta, baby pink, and red)
  • Scissors

PomPomGarland_Supplies

I have 3 big and 2 small pom poms on my garland. I made the big ones with 2 colors at a time and went back and forth on each pom pom maker half to ensure a nice, big fluffy one!
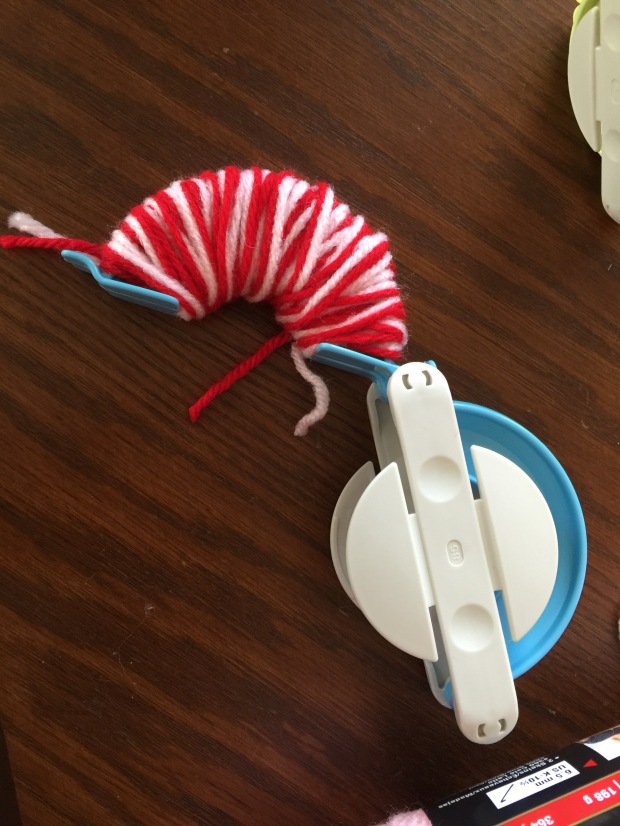
PomPomStepOne

I like big ones 😉

After you do both sides, you cut along the groove..

PomPomStep2

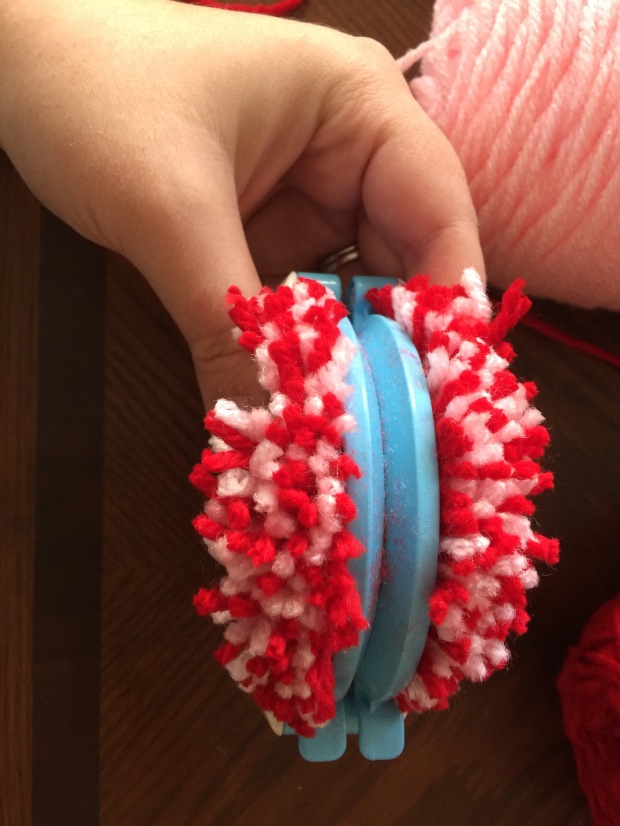
Cut pom pom, lots of fuzzies included

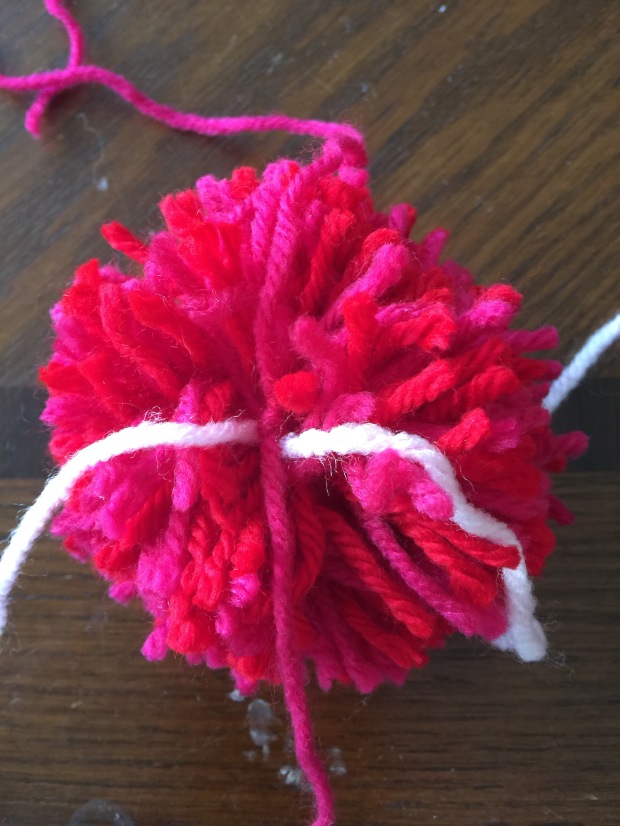
use a spare length of yarn to secure and separate the two halves and woohoo!

CompletedPomPom.jpg

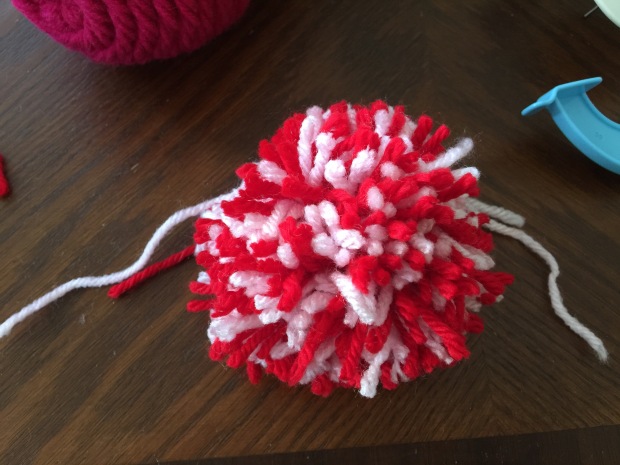
A completed pom pom! Repeat as many times as you want, I did it 6 times but only ended up using 5, because I’m a visual person and most of the time things don’t make sense until I see it haha.

String them together on one long length of yarn

PomPomAttatched

I used the baby pink for the main string to attach them. I thought it would look best on our white mantle!

Finally, hang up and enjoy!

Completed Mantle


I’m thinking about doing a rainbow one for St. Patty’s Day or maybe one in pastels for Easter. But then again, I’ll be 8 months pregnant and probably not feeling it LOL.

Anyways, get out there and make something pretty!

oxox

Catie

Follow Me on Instagram!

Follow Me on Pinterest!


WIP Wednesday

My first WIP Wednesday post in a while! I always plan to write one, but honestly I’ve been stuck on a few WIPs for several weeks so I wanted to have something fun to write about, and now I do!

Mermaid tail for Super Girl has sat untouched since last month and I kind of feel bad about it. But then again not really. So moving on!

Sockhead_WIP

Sockhead in Dexter yarn!

I’m almost to decreases on this Sockhead hat, and I’m super excited because this is a gift, but also I need these needles back for socks! I’ve never had an itch to make socks but oh man, I do right now!

And I’m still trucking along on The Doodler, I have one more cable for Clue 2. I am envious of all the people on Instagram that could knit a clue in a day! This has taken me so long for several reasons:

  • Kids. I have to sit down in the quiet to concentrate
  • Christmas knitting was my excuse in December
  • I just lost my mojo for it. It really stunk.
TheDoodler_WIP

Almost done with Clue 2!

It’s already huge, I really can’t wait to be done with it!

What are you working on??

Catie

DIY Photo Display

DIY Photo Display!

For Christmas I received a Polaroid Zip Printer that I had been lusting after (yes, lusting haha) for a while, and I absolutely LOVE it. The photos print out on 2×3 sticky paper and they are adorable and handy and I’m able to keep up on having actual physical pictures of my favorite digital snaps! They’ve been accumulating on our school bulletin board so I was on a mission to find a cute way to display them.

You can’t step into Michael’s or Hobby Lobby or any other home or craft store without being bombarded by chalkboard, ‘rustic’, burlap or mason jars. It’s. Every. Where. But I’m cheap, and I’m definitely not about to drop $50 on a made-to-be-distressed  piece of decor made in China. I just can’t.

Husband and his sailors volunteer at our local Habitat for Humanity ReStore, and it’s a great place to find home improvement items and even decent furniture and decor if you’re lucky! I asked him if they had any windows there and sure enough, they did! So for a whopping $3, I became the proud owner of a white, six paned window frame.

So, I present to you…

an easy $15 (or less!) DIY Photo Display!

DIY Photo Display


DIY_Photo_Display_Supplies

Old window, chicken wire, and clothespins

What you need:

  • Old Window
  • Chicken Wire
  • Large-headed nails
  • Hammer
  • Wire cutters
  • Cute clothespins or other clippies of your choice

Step 1:

Carefully remove glass if your window still has it (ours only had 5)

DIY_Photo_Display_RemovingPanes

Using a hammer and flathead, Husband removed most of the caulk around the glass so it popped out

empty white window frame

Ah, empty window frame!

We live in the great (and wet) state of South Carolina, and there was some mold on the frame. With some hand sanding, it came right off.

DIY_Photo_Display_Mold_Before_After

Before it was moldy, After it’s only distressed!

Step 2:

Measure out, cut, and potentially flatten enough chicken wire to cover the back of the open portion(s) of the frame.

chicken wire for diy project

Our high tech way of flattening chicken wire!

Step 3:

Stretch chicken wire across back of frame and nail in place.

DIY_Photo_Display_Nailing_Chickenwire

Step 4:

Trim up your edges so no one is stabbed walking past your beautiful project 🙂

Completed DIY Photo Display!

Completed DIY Photo Display!

Step 5:

Hang up your masterpiece! Throw your photos on and ta da! A great photo display that was a fraction of the big box store’s cost AND you’re upcycling!

DIY photo display

Michael’s had the purple sparkly clothespins, how could I say no?!

Tag me on Instagram with your completed project!  I can’t wait to see my display fill up with my favorite pictures!

Now back to knitting 😉

Catie

Follow Me on Pinterest!

FO Friday!

I am sooooo excited to finally have some FOs to share!

First up, my third and final Baby Vertebrae for 2015! This was for one of my very best friend’s fourth baby, who was due in January. I’ve had this Dexter kit from Orange Jellyfish Dream for a few months and wasn’t sure what to make with it.

DexterKit_OrangeJellyfishDream

Dexter Kit from OJD! Slice of Life and Killroom, how could I not??

My friend and her husband are also fans of Dexter so I figured it would make a good baby sweater and I could use both colors. The week of Christmas she had been saying she had a ton of pressure and some other per-labor symptoms, and I realized this project had been put on the back burner due to Christmas knitting and my Doodler (OOPS!). I got my butt in gear and finished it on the 28th, blocked the 29th, and her baby boy was born on New Years Day, WHEW!

BabyVertebrae

Baby Vertebrae done just in time!

In the midst of the craziness, these fingerless gloves for my other BFF got separated and the first mitt sat lonely for several weeks before I felt like making the next one. These are in Patons Kroy Springtime something sock yarn that is more like a DK weight than fingering so when I got an email form KnitPicks with a DK weight fingerless mitten I was alllll over that. Truth be told these were boring, but I really love the finished project and Husband has requested a pair as well haha.

FingerlessMitts

Fingerless Mitts

And finally, I am totally including my finished Clue 1 of the Doodle because I was stuck forever and played yarn chicken and lost. So, they are deserving of a FO Friday post lmao.

TheDoodlerClue1

The Doodler Clue 1: Complete!!

I’m hoping to completely finish Clue 2 this weekend! What have you been working on and/or finished??

Valentine's Day canvases on display

Easy Valentine’s Day Canvas Tutorial

Yes, I know it has just turned 2016, everyone is still fun-hungover and broke from the holidays. But I am having a major need to create, and Valentine’s Day is the next holiday in need of decoration!

So, I present to you an

VDayCanvasPin

Supplies:

  • 2 Canvases (mine were 9 3/4″ x 8″)
  • Acrylic paint in festive colors (I used a pink and a fuchsia)
  • Brush(es)
  • Modgepodge
  • Glitter (I used gold and a magenta)
  • X-Acto Knife to make cutting the outline easier, but scissors will work just a well
  • Tape

Step 1:

Paint your canvases!

Pink and fuchsia canvases

My Pink and Fuchsia Canvases drying!

Let these dry overnight. I had to do a few coats on the pink and several on the fuchsia to get it to be non-streaky looking.

Step 2:

Create your outline! I used Pages to drag and drop a heart outline, and make a outline for XOXO. If you want something a bit different, go for it! Otherwise here are the PDFs for what I used:

Heart outline

oxox

Print and cut these outlines out and tape to your dried canvas. Now your ready for the FUN part (or not so fun depending on your stance on glitter).

Step 3:

Paint some Modge Podge into the outline, make sure you get it all the way to all the edges!

Painting Modge Podge into the heart outline

Painting Modge Podge into the heart outline

Apply glitter liberally to outline..

glitter on outline

#TeamGlitter! Also for the XOXO you will need to cut and tape in place the center of the O!

Remove stencil and voilá!

Fun Valentine’s Day canvases!!

Valentine's Day canvases on display

Perfect for my mantle!

Let me know how yours turns out! Supergirl loved helping, but this could also be a fun girls’ night-in craft time! Tag me on Instagram (Follow Me here) for your finished product!

XOXO (ahhh see what I did there? haha),

Catie

Follow Me On Pinterest!


Knitting Goals for 2016 (better late than never!)

Everyone has resolutions, but knitters get to do something fun, we get to plan and plot and buy yarn! I’ve been meaning to write my list but life has gotten in the way, at least this week it has been all good things!

  • I had originally planned on making myself a sweater, preferably cardigan in 2016. But, with having a baby in May, I am already surrendering to
  1. Limited time I will have to actually concentrate on a more complex pattern or work
  2. I won’t feel like myself or be back to a normal size for awhile.
  3. Living in Arizona for the foreseeable future
  • So, a cardigan may be in the books for 2017.
  • I am seeing socks, hats, and shawls for 2016. Smaller projects, varying skill levels, quicker finishing time, plus less bulk on me/baby in Arizona heat haha.
  • I have a shawl pattern written up, and I have an idea for a hat but I need to actually write it down. I’m hoping to release both in the first half of the year!
  • Baby knits, because I knit for everyone else’s baby I should probably knit for my own! With a May baby though, I’m thinking I want to do socks and maybe a light blanket (does such a thing exist?) for him. We’ll see.
  • Possibly become a certified instructor via CYC

What are your knitting goals for 2016? More or less than 2015? Different? I love the forward momentum I feel from knitting, like every project I finish I now have the knowledge and experience to do more.